Images Masking #
Kernel masking, also known as convolution masking, is a technique used in image processing to apply a specific filter or kernel to an image. This technique involves sliding a small matrix, known as a kernel or filter, over the entire image and performing a mathematical operation at each pixel location. The resulting output image is a new image that has been transformed based on the filter’s characteristics.
The kernel or filter used in convolution masking is a small matrix typically containing odd numbers of rows and columns, such as 3x3, 5x5, or 7x7. The elements of the kernel represent the weights assigned to each pixel in the image. The weights determine how much influence the pixel has on the resulting image after the kernel is applied.
The mathematical operation performed at each pixel location involves multiplying the values of the kernel by the corresponding pixel values in the image. The resulting products are summed, and the final result is assigned to the corresponding pixel location in the output image. This process is repeated for every pixel in the image, resulting in a new transformed image.
Kernel masking is a powerful technique used in various image processing tasks, such as image smoothing, sharpening, edge detection, and feature extraction. The choice of kernel used depends on the specific image processing task at hand. For example, a Gaussian filter kernel is commonly used for image smoothing, while a Sobel filter kernel is used for edge detection.
Masking Example - Operation of a sharpen 3x3 masking being applied to an image:

Shaders optimization for masking #
Shaders are programs that run on the GPU. They are used to perform calculations on the vertices and pixels of 3D objects. Shaders are written in a special language called GLSL (OpenGL Shading Language) and typically consist of two parts: a vertex shader and a fragment shader. The vertex shader is responsible for transforming the vertices of 3D objects into screen coordinates, while the fragment shader is responsible for calculating the color of each pixel in the image.
Knowing this is clear for masking an image using shaders we need to create a vertex shader and a fragment shader, the vertex shader will be used to transform the vertices of the image into single pixels coordinates, and the fragment shader will be used to calculate the color of each pixel in the image and its neighbours, then apply the corresponding kernel to obtain the new color of the pixel.
Histograms #
A histogram is a graph that shows the frequency of occurrence of each intensity value in the image. By analyzing the histogram of an image, we can gain insights into the image’s characteristics, such as its brightness, contrast, and color balance. Histograms are widely used in various fields, such as photography, computer vision, and machine learning.
In image processing, a histogram is a function that counts the number of pixels in an image that have a particular intensity value. The horizontal axis of the histogram represents the intensity values, and the vertical axis represents the number of pixels with that intensity value.
Histograms can be calculated for each channel of an RGB image, representing the red, green, and blue color channels. This allows us to analyze the distribution of pixel values in each channel independently. We can also calculate a combined histogram that represents the distribution of pixel values across all three channels.
Histogram equalization is a technique used to adjust the distribution of pixel values in an image to improve its visual quality. This technique involves stretching the histogram to make the intensity values more evenly distributed. This can improve the image’s contrast and brightness and make it more visually appealing.
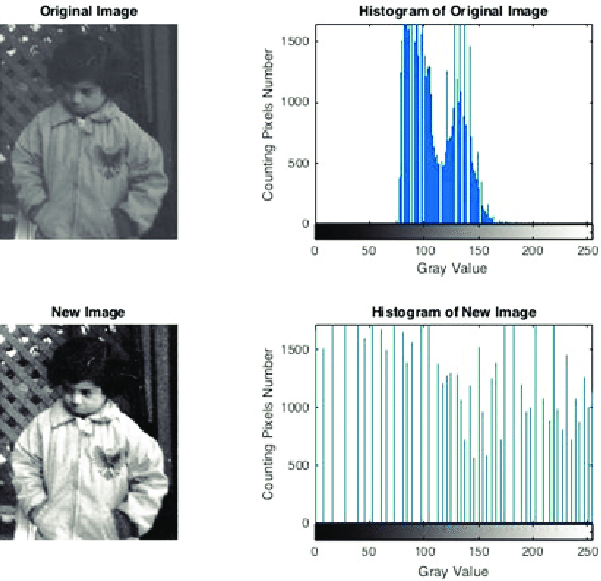
Histogram Example - Example of two histograms over a masked image:
Brightness control #
Brightness control is another important technique in image processing that can be used to adjust the overall brightness of an image. By increasing or decreasing the brightness, we can make an image appear lighter or darker, respectively. This can be useful for correcting underexposed or overexposed images, or for enhancing the visibility of certain features.
Brightness control is typically performed by adding a constant value to each pixel in the image. This constant value is known as the brightness adjustment factor. The brightness adjustment factor can be positive or negative, depending on whether we want to increase or decrease the brightness of the image. The larger the value of the brightness adjustment factor, the more pronounced the effect of the brightness control.
Another way to implement such technique is by using other colors modes, such as HSB or HSL. In these color modes, the brightness of a color is represented by the brightness component, which is a value between 0 and 100. By increasing or decreasing the brightness component, we can increase or decrease the brightness of the color, respectively. This can be useful for adjusting the brightness of an image without having to change the color of the pixels, but by using this technique, we lose the ability to control the color of the pixels independently, wich can lead to undesirable results.
Special Keys
| Key | Description |
|---|---|
| F | Change mask |
| G | Show histogram |
| H | Change image |
| J | Change Histogram |
| K | Change mask mode |
| V | Decrease brightness |
| B | Increase brightness |
| R | Reset image |
Code Explanation #
Masking #
The program has a set of kernels and images that will be preloaded, those sets are gona be used to reset the image and to change the mask, so the image being modified is in another variable so it can be modified as much as wanted without affecting the original image, the kernels are 5x5 matrices that are used to modify the image, the kernel is applied to the image by passing the image and kernel to a shader, the shader will apply the kernel to the image and return the completely modified
function convolveImage(image) {
  for (let posX = 1; posX < image.width - 1; posX++) {
      for (let posY = 1; posY < image.height - 1; posY++) {
          let operatedPixel = getConvolution(image, posX, posY);
          let position = (posX + posY * image.width) * 4;

          image.pixels[position] = operatedPixel.r;
          image.pixels[position + 1] = operatedPixel.g;
          image.pixels[position + 2] = operatedPixel.b;
          image.pixels[position + 3] = 255;
      }
  }

  stroke(300, 100, 80);
  image.updatePixels();
}
function convolveImage(image) {
  // Create an off-screen graphics buffer
  let buffer = createGraphics(image.width, image.height, WEBGL);

  // Set the shader on the buffer
  buffer.shader(convolution_shader);

  // Set the shader uniforms
  convolution_shader.setUniform('tex0', image);
  convolution_shader.setUniform('texSize', [image.width, image.height]);
  convolution_shader.setUniform('kernel', masks[selected_mask]);

  // Get the modified image as a p5.js image object
  let modifiedImage = buffer.get();

  // Reset the shader
  buffer.resetShader();
  buffer.remove();

  // Return the modified image
  return modifiedImage;
}
Shaders #
Against the old version, the new one with shader ussage is much more simple as the main logic is executed by the GPU wich is much more efficient than the CPU in those kind of calculations, so for this task the challenge can be divided in two:
- Get each pixel of the image to be modified (vertex shader)
- Apply the given kernel to the pixel with its neighbors pixels information (fragment shader)
For this the two GLSL code was developed as follow:
#ifdef GL_ES
precision mediump float;
#endif

attribute vec3 aPosition;
attribute vec2 aTexCoord;

varying vec2 vTexCoord;

void main() {
  vTexCoord = aTexCoord;
  gl_Position = vec4(aPosition, 1.0);
}
#ifdef GL_ES
precision mediump float;
#endif

uniform sampler2D tex0;
uniform vec2 texSize;
uniform float kernel[25];

void main() {
  vec2 st = gl_FragCoord.xy / texSize;
  vec4 sum = vec4(0.0);

  // Apply the kernel by sampling surrounding pixels
  for (int i = -2; i <= 2; i++) {
    for (int j = -2; j <= 2; j++) {
      vec2 offset = vec2(float(i), float(j)) / texSize;
      sum += texture2D(tex0, st + offset) * kernel[(j + 2) * 5 + (i + 2)];
    }
  }

  gl_FragColor = sum;
}
Analyzing the code more in detail we can see that the vertex shader takes the complete image and generate a texture coordinate for each pixel, this texture coordinate is used by the fragment shader to get the pixel color of the image, the fragment shader also takes the kernel and the size of the image, with this information the fragment shader can apply the kernel to the pixel and return the modified pixel color.
Histogram #
The histogram is a graph that shows the frequency of occurrence of each intensity value in the image, the histogram is calculated by counting the number of pixels in an image that have a particular intensity value, the horizontal axis of the histogram represents the intensity values, and the vertical axis represents the number of pixels with that intensity value, the histogram is calculated by counting the number of pixels in an image that have a particular intensity value, the horizontal axis of the histogram represents the intensity values, and the vertical axis represents the number of pixels with that intensity value.
Histogram calculation and equalization
function calculateHistograms() {
  histograms = [];

  // Init the histograms array
  for (let i = 0; i < 4; i++) {
    histograms.push(new Array(256).fill(0));
  }

  // Calculate the histogram for the three color channels and the average
  for (let i = 0; i < masking_canvas.width; i++) {
    for (let j = 0; j < masking_canvas.height; j++) {
      // Get the color channels
      let channels = getPixel(i, j);

      // Calculate the average
      let avg = (channels[0] + channels[1] + channels[2]) / 3;

      histograms[0][avg]++;
      histograms[1][channels[0]]++;
      histograms[2][channels[1]]++;
      histograms[3][channels[2]]++;
    }
  }

  // Scale down the histograms to fit the histogram canvas
  scaleDownHistograms();
}

function scaleDownHistograms() {
  // Iterate over the histograms and scale them down
  for (let i = 0; i < histograms.length; i++) {
    let scale_factor = histogram_canvas.height / max(...histograms[i]);

    for (let j = 0; j < histograms[i].length; j++) {
      histograms[i][j] *= scale_factor;
    }
  }
}
Brightness control #
Brightness control is another important technique in image processing that can be used to adjust the overall brightness of an image. By increasing or decreasing the brightness, we can make an image appear lighter or darker, respectively. This can be useful for correcting underexposed or overexposed images, or for enhancing the visibility of certain features.
In the implementation of this technique was done by adding a constant value to each pixel in the image. This constant value is known as the brightness adjustment factor. The brightness adjustment factor can be positive or negative, depending on whether we want to increase or decrease the brightness of the image. The larger the value of the brightness adjustment factor, the more pronounced the effect of the brightness control.
Brightness control
function operateBrightness(value) {
  current_image.loadPixels();
  let [r, g, b] = [0, 0, 0];

  for (let i = 0; i < current_image.pixels.length; i += 4) {
    [r, g, b] = [current_image.pixels[i], current_image.pixels[i + 1], current_image.pixels[i + 2]];

    current_image.pixels[i] = constrain(r + value, 0, 255);
    current_image.pixels[i + 1] = constrain(g + value, 0, 255);
    current_image.pixels[i + 2] = constrain(b + value, 0, 255);
  }

  current_image.updatePixels();
}

function controlBrightness(increment = true) {
  if (increment) {
    operateBrightness(5);
  }
  else{
    operateBrightness(-5);
  }

  histogram_changed = true;
}
Interactivity #
This was deffinetly the most challenging part of the project, the interactivity was implemented by using a series of flags that allows the interactivity of the 3 main features of the project, the masking, the histogram and the brightness control, the flags are set to true when the user clicks on the corresponding button, and the flags are set to false when the user clicks on the same button again, this way the user can toggle the feature on and off.
Other flags are only as a state machine to control when a certain component need to be updated (this was thone this way for optimization reasons), for example, the histogram is only calculated when the current selected image in changed in any way, and the changes to the image are calculated only once in the workflow.
Interactivity
let show_histogram = true;
let histogram_changed = true;
let mask_changed = true;
let local_mode = false;

function draw() {
  background(52, 58, 64);

  if (mask_changed) {
    // Check to apply the mask locally or globally
    local_mode ? applyLocalMask() : applyGlobalMask();

    // Reset the flags
    mask_changed = false;
    histogram_changed = true;
  }

  // Histogram has a change, calculate the new histograms
  if (histogram_changed && show_histogram) {
    calculateHistograms();
    histogram_changed = false;
  }

  // load the selected image to the masking canvas
  masking_canvas.image(current_image, 0, 0, CANVAS_SIZE, CANVAS_SIZE);
  displayName(mask_title, masking_canvas);
  image(masking_canvas, 0, 0);

  // Display the histogram if the flag is true
  if (show_histogram) drawHistogram();
}

function keyPressed() {
  switch (key) {
  case 'f':
      switchMask();
      break;
  case 'g':
      show_histogram = !show_histogram;
      histogram_changed = true;
      break;
  case 'h':
      switchImage();
      histogram_changed = true;
      break;
  case 'j':
      switchHistogram();
      break;
  case 'k':
      local_mode = !local_mode;
      clearMask();
      break;
  case 'v':
      controlBrightness();
      break;
  case 'b':
      controlBrightness(false);
      break;
  case 'r':
      clearMask();
      break;
  }
}
Final Thoughts #
This masking thechnique is widely used in image processing, and it can be used to perform a variety of image processing tasks, such as image smoothing, sharpening, edge detection, and feature extraction. The choice of kernel used depends on the specific image processing task at hand. For example, a Gaussian filter kernel is commonly used for image smoothing, while a Sobel filter kernel is used for edge detection, more especifcally in the visual effects industry for copmposting and applying color corrections, the features extraction technique among complex IA models are capable of optimize the work that later on must be done by a human, and the histogram equalization is a technique used to adjust the distribution of pixel values in an image to improve its visual quality, this technique is used in profesional photography to improve the image’s contrast and brightness and make it more visually appealing.